 Once you’ve started working with creating and managing online resources for your students, it becomes natural that the ways the students communicate with you is going to change a little bit. Here are some guidelines for ways you can communicate with your students, and some ways to protect yourself while doing so.
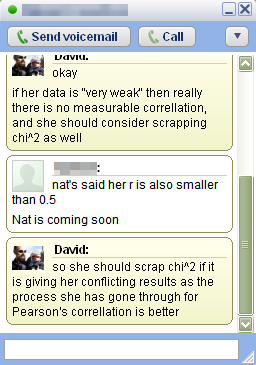
Last night a student of mine asked me a question while I was online through Google chat. I didn’t mind answering it, and so we had a quick 5 minute discussion about her project. This saved me a bunch of time the following day, because I didn’t need to repeat the same conversation with everyone else, I just posted the relevant information to my classroom Math blog and then all of the students had access to it.
Google chat has a very handy safety feature for teachers, it automatically records your chat history, which you have access from your Google mail account. This means that you can easily protect yourself from any accusations of misconduct which might occur. This process is very similar to a student calling you on your phone and so the same principles apply. If you don’t want a student trying to contact you via Google chat, don’t give out your gmail address.
You can also communicate quite effectively with students via email. This has the advantage of allowing multiple students to receive responses, being able to record your conversations for later, and finally being able to send responses when it is convenient for you. I hate it when students come up to me immediately after a class and ask a bunch of detailed questions because I almost always need to go to the bathroom, or prepare for another course, or get a snack. These are the times when being able to send an email later is very handy.
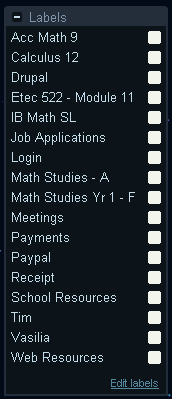 Google mail has two neat features that make email with students a bit easier to manage. The first is that you can apply a label to any email message sent or received between you and a student, which is a handy way of finding messages from students in specific classes. The other feature I like is called filtering, which can allow you to perform automatic actions on emails that you receive depending on the sender, the contents of the email, etc… One of the things I like to do is automatically label student emails by class when I receive them.
Finally, never delete emails between you and a student. They are proof that you have been trying to help the student, which can be useful for administrative reasons I won’t go into here. You can keep them to help yourself remember what types of questions ask about particular topics. Finally your record helps protect you from potential problems later.
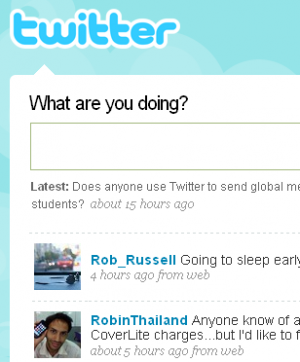 An interesting and relatively new way to communicate with students is through a website called Twitter.com. This website basically acts as a place where you can post a quick (140 characters maximum) message to the world, and anyone who is "following" you gets a copy of the message. Since you can forward messages sent to you to your cell phone, it allows you to receive messages from an online source quickly and easily to your mobile phone. This can be an easy way to set up a one-way broadcast system between you and each of your students in a particular class. As long as you don’t "follow" your students’ messages, you won’t get any messages from your students that you don’t want.
Emails and chats are good for 1 on 1 or 1 on a few types of communications, but by far the best tool I have used for communication with my students is my classroom blog, described in another post. Basically, I post information, worksheets, assignments to my mathematics blog, and students can all come read it on their own time. The information is totally public and always available to look at later. I also have students do daily summaries of what happened in class, which means I have a record of all of my lessons. Students are free to post comments, which gives me some idea of what the class understood, and what they had difficulty. For some reason I find my students are a bit more honest when responding on the blog, or rather less likely to remain silent about difficulties. In fact, I’ve enacted policy changes because of legitimate complaints students have brought up through the blog, so it has acted as a tool to empower students as well.
These are 4 ways you can communicate online with your face to face students on a day to day basis. Although we all don’t want our professional life to creep into our personal life too much, we also want to make sure that we help our students learn effective modes of communication, and that they have the help they need to handle those difficult projects we seem to be throwing at them endlessly these days. Stay tuned for a future article about how to use Dimdim.com for communicating with up to 20 students simultaneously for free.
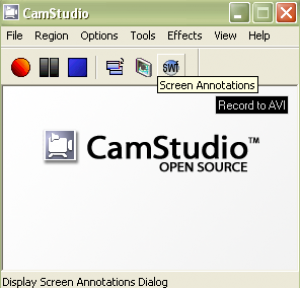 Once in a while I have a new application, web applet, or web site I want students to use. Occasionally these programs are somewhat tricky for my students to use, so when this happens, I create a simple video for my students to watch to introduce the programs. Of course, I don’t want to pay any money to create these short tutorials, so I have a simple process I follow (which works on Windows):
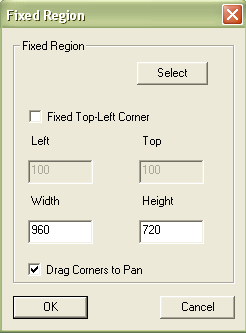 When I start recording, I open up Camstudio Recorder, set up my tutorial space I want to record (whether it is an application, a website, or whatever) and then change the settings in Camstudio Recorder so that I record the part of the screen I want to record.