Education ∪ Math ∪ Technology

Tag: video (page 1 of 1)

Free Multimedia Resources

I’ve created a list of free multimedia resources for teachers. Some quick research has shown me that there are already some excellent lists of resources out there, but for a variety of topics. This list is intended to compile those lists into one location.

General multimedia:

http://thecleversheep.blogspot.com/2009/02/creative-commons-chaos.html

http://www.archive.org/

http://search.creativecommons.org/

Here’s a list of open source software some of which is useful for multimedia


Audio:

Some great examples of free audio to be used within student projects: 

http://www.freetech4teachers.com/2010/08/7-sources-of-free-sounds-for-multimedia.html

http://www.freesound.org


Free audio mixers/editors:

http://www.freetech4teachers.com/2009/09/myna-free-online-audio-mixer.html

http://www.getpaint.net/ 


Images:

Free image editors:

http://www.aviary.com/online/image-editor?lang=en

http://www.gimp.org/

http://www.getpaint.net/

http://docs.google.com (create a new document => drawing)


Creative commons & free pictures:

http://www.flickr.com/

http://www.google.ca/imghp?hl=en&tab=wi (advanced settings then "filter by license", change to labelled for reuse)


Video

Online editors:

http://www.pixorial.com/

http://jaycut.com/

http://www.moviemasher.com/

http://www.cellsea.com/media/vindex.htm

http://www.videotoolbox.com/


Video converters:

http://avanti.arrozcru.com/

http://www.youtube.com

http://handbrake.fr/

http://jeffthomastech.com/blog/?p=7195

http://www.any-video-converter.com/products/for_video_free/

http://format-factory.en.softonic.com/

http://www.mirovideoconverter.com/

http://videoconverter.hamstersoft.com/us/

http://www.freemake.com/


Video editors:

http://en.wikipedia.org/wiki/List_of_video_editing_software (not all of these are free, but many are)

Twenty ways to use video in your classroom

Here are 20 ways you can use video creation with your students in your classroom. 

1. Have students video tape themselves playing sports and use the video to analyze their performance.

2. Have a guest student just checking out your school (we have this a lot at our school). Make them the school reporter and pass them the video camera or have them interview you.

3. Have your students create video word problems for math or science.

4. Record footage of something in motion and analyze the footage to determine the physics of the motion.

5. Record your lesson and share it with students later. You could also pre-record your lesson and assign the video as homework so you have more time for guided practice in class.

6. Have students record a tutorial from a topic for your class.

7. Have students present research or the result of an experiment through a video presentation.

8. Student created documentary of another process, like getting ready to perform a play.

9. Have students create video reflections or journals.

10. Try a fresh approach to the boring book review.

11. Have students create a story and narrate/act it out. Record what results!

12. Have your students record their creative writing or poetry.

13. Create a music video.

14. Record your class doing a debate about a real life topic (like educational reform for example).

15. uStream your classroom (for example so that students who are at home ill can still participate).

16. Invite a guest speaker into your classroom, from anywhere in the world, via Skype.

17. Set up live streaming from your classroom and let your colleagues in another room observe you and give you feedback.

18. Set up live streaming from your classroom and invite the parents of your students to see what you do in the classroom (not for the faint of heart!).

19. Show a demonstration of something which would otherwise be extremely difficult to find in a classroom.

20. Let your students explore their creative side and produce a video that summarizes (in a catchy way ideally) what they’ve learned about a subject. Call this the summative assessment for that unit.

Please add any other suggestions you have to the comments (or even better help me find examples of the last 6 ideas).

Student created videos using free Windows tools

So today I tried an experiment out.  I wanted to see if I could use Windows tools, freely available, already installed on our school’s computers, and produce reasonable student videos.  I succeeded, and I’d like to share my success here.  The process is pretty simple, and not too time-consuming, and best of all, student friendly.

For those of you who like the quick and dirty, the basic steps are:

  1. Create individual frames in Microsoft Word (or any text editor).
  2. Take a screen-shot of each of these frames.  Generally this is done by pressing the ‘Prt Scr’ or ‘Print Screen’ button on your keyboard.
  3. Paste the individual screen-shots into Microsoft Paint, one at a time and save each as their own file.  You want all of the images to have the same width and height (400 by 300 is good or 800 by 600).
  4. Open up Windows Movie Maker and import all of the image frames created in steps 1 to 3.
  5. Drag the images and order them into the movie time-line below the collection of images.
  6. Add special effects, like video transitions, subtitles, narration, whatever.
  7. Save the project (so you can edit it later) AND save it as a movie as well. 
  8. Upload to your favourite video sharing site (Youtube, Vimeo, Pixorial) and share it with whomever you want.

Here’s an example video done by a student in a single 85 minute period (they actually had about 70 minutes to work on it because of pre-activity instructions).

Turning Math word problems into Math video problems

Last year I tried an experiment after being exposed to research about the Jasper project.  The basic idea of this project is, turn difficult word problems into authentic video problems which include potential extensions.  The experiment was this, have my students create the video word problems, and start creating a library of these problems to use with my future classes.

The experience of creating the problem has some minor mathematics in it, after all the students need to formulate a difficult problem, verify that they are able to shoot the problem on video and then show a working solution to the problem (on paper or handed in separately in digital form).  These skills are quite difficult, and are higher order skills in Bloom’s taxonomy.

Here’s an example of one of these word problems on the right.

It’s important to note here that there are some very difficult mathematical concepts embedded in this video.  Students will need to be able to understand rate problems, solve for the distance of the falling object using kinematics, and use trigonometry to determine the distance that needs to be traveled, and then go back to rate problems to answer the question.

The whole process from start to finish took about 2 weeks (or 8 classes).  One class to brainstorm the idea, one class to decide on the script and come up with the text version of the problem, and a few classes to solve the problem and do some in-class video editing.  Yes, this is a lot of time, but in terms of building student self-esteem, working on very important collaboration and planning skills, it is worth it.

There’s no way that is actually enough time to produce such a high quality (for a student group) video, so I know for sure that lots of time was spent on this video outside of class, probably many hours of time.

So this process also inspires the students and gets them excited about your material.  They will work much harder when they are excited about coming to class.  

The video editing process itself was fairly straight forward.  Most groups shot the clips with standard digital cameras, and then recorded the audio tracks after their video was done on their computers using Audacity.  One group used iMovie for their editing and production, and the other 3 groups used Windows Movie Maker which was totally sufficient for their needs.  If you want a no-install option, you can look at using Pixorial.com which I’ve tested out myself and works fairly well.  It only really lacks two important features, the ability to edit the audio track separate from the video, and the ability to modify the video itself (instead of just moving it around), such as slow-motion, etc…

Check out these other two videos.  Maybe use them with your class and try and solve the problems.  As far as I remember, all of them have solutions, although some will require students to estimate distances.

Digital Story

Why did you choose this particular tools? How did the tool impact the manner in which you told your story (perhaps in a way that is different had you just used text or related the story using your voice)? How might you use such tools in your own teaching to produce materials for students? How might students be given access to the same authoring tools? What kind of impact would you expect to see in your students in terms of motivation, creativity, or any other characteristics?

Our job was to play around with some of the Web 2.0 tools now available for creating online/offline presentations. There has been tremendous competition in this area, especially if this list of tools we were given by our professor is any indication. Choosing one of these tools would be time-consuming, however in this case I had Twitter to help me. Turns out that on Twitter lots of people I’m following are raving about Prezi, a relatively new tool which looks to me like a replacement for PowerPoint.

I actually did this assignment wrong at first. I used Photostory 3, a program Microsoft puts out which is surprisingly decent and easy to use. After uploading my video to Youtube, I went back and reread the assignment, and discovered I was supposed to use one of the tools listed on the Wiki page above. Oops. Guess I should be less surprised when my students mess up an assignment.

Fortunately Prezi is pretty easy to use, and I had already collected all the photos I wanted to use. Within an hour I had most of the presentation up and going. One problem I had though was embedding audio with my presentation. I really think music or a voice over included in an online presentation is key, otherwise the presentation might be a bit boring. So I did some digging around and found out Prezi allows you to embed SWF files (usually created with the Adobe Flash authoring program) into presentations. I just created a simple SWF with the audio I wanted embedded (a very famous Thai song… hope I don’t get Prezi banned in Thailand!) and set to play as soon as the SWF is downloaded. Making the SWF super small (1px by 1px) makes it seem as if the audio is part of the presentation, rather than a separate download.

I found that when using Prezi, adding each image takes a bit of time. Aligning the text with the image, especially when the image was rotated AND the frame to hold the text and image was rotated was difficult. I had to fiddle with it quite a bit to get everything to look right. This meant I didn’t really want to add more frames than was absolutely necessary to tell my story, and my Prezi presentation ended up being quite a bit shorter than my Photostory presentation.

Telling a story this way is interesting, partially because there’s no opportunity to clarify anything you’ve written. I found myself editing the text quite a bit to make sure that none of it was controversial (I’m going to be sending this to family) or could be "taken the wrong way" out of context. Without the ability to see the audience this presentation is for, I lose a lot of the very useful two-way communication that occurs when you tell a story. For example, I have no idea if anyone else will even like this presentation!

I think I’ll use Prezi next year with my students. I usually have students create a review of what we have done in class, generally as a PowerPoint presentation. Creating the presentation in digital form definitely increases the amount of time it takes to do the review portion of the assignment, but makes the giving of the presentation decidedly easier. One advantage, an important one I think, of Prezi over PowerPoint is the fact it can be used from anywhere, is easy to move between computers, and can be easily shared/embedded online. As well, none of the students needs to pay for using Prezi, which means I can reasonably expect all of my students to have the required software (they need a web browser).

I’m going to be teaching science and mathematics next year. In mathematics, a typical word problem is like a story. One way I could help students improve their ability to solve word problems is to view the problem like a story. In fact, I’ve had students create their own word problems (and video problems!) and I think that if we story-boarded the word problems, using a presentation tool like Prezi, then they might have a better understanding of the steps involved in solving the problem. Students have a variety of different learning styles, and this might help some of the students understand word problems who normally have difficulty.

In science there are lots of stories, especially in Biology. I could imagine telling the story of the life cycle of a tadpole/frog for example using one of these presentation tools. Seeing the life-cycle visually would definitely help students see the changes that occur in the frog as it matures. Telling the story themselves would help them remember it, and understand a fundamental principle of biology, the cycle of life.

Prezi is cool. It does all these neat turns and twists, etc… when transitioning between slides. This is pretty hard to do with PowerPoint and way cooler looking than the typical twists, etc… Prezi is also much easier to use than PowerPoint. After only two presentations, I think I’m pretty competent with it. Spending time during class learning how to use software isn’t my cup of tea, I’d rather the tool students are using is so straight forward you can teach it in 10 minutes. Any longer than that and you have to do loads of reteaching.

Students will like using it because it’s easy and free. It allows them to be creative while not burdening them with cumbersome multi-step "formulas" for getting simple things done.

The drawback I see for students is the audio portion. I hope the people at Prezi.com get that figured out soon. Adding an audio file to your presentation has got to be easier than what I went through. I mean I found it easy, but I’ve devoted a lot of time to learning Flash, time better spent doing something else I think from a student’s perspective.

You can view it at http://prezi.com/129140/view/. Wait a bit for the music to start, the images to download and then click on the right arrow at the bottom to navigate through the slides.

How has multimedia enhanced my learning?

The best example of multimedia I watched recently from which I really learned a lot was a movie I watched about a relatively new farming practice called "Biodynamic farming".

The video was relatively simple, done documentary style, but without seeing the actual practices they were discussing first hand through the video, I would not have understood what biodynamic farming was. This practice takes place largely in rural India, a place I am not likely to visit soon given it’s vast distance from me, so the video really brought me closer to the action.

What I learned about biodynamic farming is that it is a mix of typical organic farming with a sense of mysticism. Basically you have to prepare this special mixture of manure for composting, and the whole procedure is done in a very stylistic way. The purpose of this addition of religion to farming is actually make the practice, which is quite different from what Indian farmers have been doing under the so-called "Green revolution" more palatable for them. Superstition and religion are much more the part of the daily lives of the rural Indian people than they are for us, and combining some of their superstition with the farming practices has really turned them onto this way of farming, not to mention the results it produces.

Much of rural Indian farming has been destroyed by the Green revolution for many reasons, as I discovered from the video. First, the bacteria in the soil begin to die over the years as the chemicals used for fertilizing the plants become toxic to them. The soil begins to become more easily eroded, and uses much more water for irrigation. After 30 or 40 years, much of the farmable soil in India has been nearly destroyed. Biodynamic farming basically forces the farmers to spend much more attention on ensuring that the soil quality is high using more natural means. Within a couple of years, the soil can be restored, and food production goes way up.

I really like watching documentaries like this. They bring me to all corners of the world, in much the same way as books do (with one’s imagination). The visuals of the real world farming in this video were mixed with some charts describing the changes that were occurring, and the mix of the two types of media helped solidify my understanding of the situation. In fact my wife and I are planning on using some of the principles (minus the mysticism) in our own garden, once we have one.

Video authoring reflection

I just finished our assignment to do some video editing. Results below.

What was difficult about this assignment for me was not the creating of the video, but the choosing of a topic "relevant for my LMS". The particular modules I am doing in my LMS are for a mathematics course, and creating a useful video exercise to do for a mathematics course can be quite difficult. In fact, I think that these videos don’t quite make it, without some explanation, my weaker math students won’t be able to solve the problems.

Creating the video did not take very long (it shows!). It took me about 30 minutes to get the clips (2 minutes taping, 5 minutes walking, 23 minutes helping my parents with a technical problem when I went over to their place) and about an hour or so to edit them and add the audio narration and maybe another 10 minutes to get it uploaded to Youtube and embedded in a page in my LMS. I can imagine doing this once in a while, but not a regular basis.

Instead what I will do is have my students create the videos. I think these work a lot better, and the process is much less time intensive for me! See an example of this below (posted to Youtube with my students permission). |Click here to see the student video

DVD authoring


I actually didn’t burn a DVD for this activity, instead I will discuss the process as I have done it before.  This is because my laptop doesn’t do a very good job of burning DVDs (and I’m stuck on it for the summer until our stuff arrives from Bangkok) and I don’t have any DVDs to burn (one of the drawbacks of living on a small island for the summer).

I’ve burned many DVDs in the past, and the process really only has a few drawbacks I can see.

The first hitch that happens is finding software which will reliably and cheaply burn DVDs.  I’ve tried a variety of different software packages and one that I have used quite a bit is called Nero.  Unfortunately Nero costs money, and isn’t open source, so I’d really rather find a replacement, however the feature set of Nero is exceptional, it can handle pretty much any task related to your CD/DVD drive.  I have tried a few open source packages here, and none of them appealed to me terribly.  Maybe someone can give me a suggestion for something I should be using?

The second problem which happens when burning a DVD is ensuring that whatever you are using to burn the DVD with can handle the type of video media you are burning.  There are tonnes of different video formats, including a whole swack of proprietary video formats (like the one my Video camera uses, yay!).  This leads to endless searches for ways of reliably converting the video you have into a format that your DVD burner likes.  Yech.

A third problem is time.  Nero takes longer than the actual play time of the movie itself to burn the movie.  This is because it first converts the video file you have into the proper format, then burns it.  The actual burning itself takes maybe 5 minutes, the rest of the time is spent on the conversion.  I’ve been told that if I have more memory for my computer (I’m at 2GB on my desktop machine and 1Gb for my laptop) that this conversion takes a lot less time, but that will have to wait for a new computer (I’m too cheap to buy more memory for either).

A fourth problem is the fun stuff like title screens, DVD chapters, etc… which Nero does not do a good job with.  The basic template Nero uses for the resulting DVD video is not too hot, it could definitely use a lot of work.

My wife and I have also noticed that we have a problem with the final DVDs we burn.  They work fine for about 5 or 6 showings, and then begin to degrade in quality over time.  We never did manage to determine if this was caused by Nero, the DVD burning hardware in our computer, or by the DVD player itself.  It has been a frustrating thing to our two year old son that “No you can’t watch that movie anymore, because the DVD is broken” or to our relatives abroad who liked seeing our home videos of our son over and over again.

DVD burning is a pretty tried and tested technology, but it is a complicated thing to do for most people, and not for the faint hearted.


Making mathematics fun

One major barrier to students learning mathematics is that they spend a lot of time NOT enjoying themselves.  Let’s be honest, listening to poetry is enjoyable if the poetry is selected carefully.  Having discussions about current events in History, while learning critical analysis skills, is fun.  Solving a cubic equation is just not a lot of fun, even for mathematicians.

We as mathematics educators are charged with the job of making math accessible and more easily learned by our students.  It makes sense therefore to inject a bit of fun in once in a while, especially if you can justify it with some educational theory that suggests it is pedagogically worthwhile.

Trebuchet project
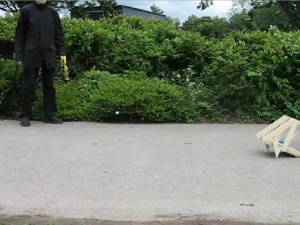
A project I have done with my 9th grade students now for 4 years in a row, is to have them do some quadratic modelling.  When I worked in London, I was really lucky because the students were creating trebuchets and catapults in their Design class.  So we had a class where the students took their models they created in Design up to the nearest park, and we took digital footage of the trebuchets in action.

At the end of the period, when the students had enough footage, they submitted some samples of their models at work in digital form directly to my computer, and that night I converted their video to a usuable form.  This actually meant I spent hours figuring out how to convert all of their wacky video formats into something readable by the FFMPEG converter to an flv file, which I could then set up to stream.

There were some technical difficulties which some of the groups had.  For example, one of the groups decided to do their footage from 20 metres away with no background…their poor little golf ball wasn’t very visible in their footage.  Another group videographer had a very unsteady hand.  However, I ended up with 6 good videos, so I split the students into 6 groups and they went to work analyzing their footage the next class.

Students had to figure out a way to convert the flight of their ball into coordinates, in other words numerical data.  They then had to decide on a model for their data, and find an equation to represent it.  I also had them calculate the mean horizontal speed (which involved being able to convert frame rates into an appropriate unit of time).  Finally there were some questions the students had to include in their write-up for this projectto focus their thinking on the physical phenomena that happened.

What was wonderful about this experience is the reaction of the kids.  At all stages of the project they were all actively engaged and interested in what they were doing.  The mathematics, which could have been very dull and boring for them came alive.

Just listen to the reaction of the students in the video when their trebuchet goes off for the first time.  How often do you get to hear a spontaneous cheer in a mathematics class?