Education ∪ Math ∪ Technology

Month: November 2009 (page 1 of 1)

Comparison of different learning theories

The focus of ETEC 512 is the theory behind learning.  We’ve spent the past 12 weeks looking at different learning theories, and discussing how these learning theories are applicable to our students and our lives.  It’s been a pretty interesting overview for me, and one I’m surprised more teachers don’t have to go through.  Although I suspect many of these theories feel far removed from the daily part of a classroom, really they embody the very essence of why we teach, and what our best practices are.

I’d like some feedback on my concept map I’ve created of these learning theories if possible.  Click on the image below to see the map in full, then return here to add a comment if you can.  This assignment is an important part of our final summative assessment for this course, I’d like to do it right.  Feedback is always a useful way to improve one’s understanding!

Using Google docs for student report cards.

Here’s the basic idea.  I create 31 identical (one for each of our 11th and 12 grade students) Google Documents using a agreed upon template.  The teachers have access to edit the documents, and add their grades.  Our IB diploma coordinator adds comments to the documents, and then we download the documents as PDF files, ready to be emailed to the parents.  We could do this entirely electronically, but we are also going to print a copy to mail to the parents for their records.

The trickiest part is making sure that the documents that are formed will look good when converted to a PDF.  I suggest using a very simple structure of the documents, in this case less is more.

Our document has our school logo at the top, a space for a generic comment about our program, a simple 2 column table to report grades in subjects, space for a more specific comment about the student’s performance, and then space for our IB coordinator to sign the report, which he’ll only be able to do once it’s printed.

See what it looks like as a PDF here:

View sample as PDF

Student created videos using free Windows tools

So today I tried an experiment out.  I wanted to see if I could use Windows tools, freely available, already installed on our school’s computers, and produce reasonable student videos.  I succeeded, and I’d like to share my success here.  The process is pretty simple, and not too time-consuming, and best of all, student friendly.

For those of you who like the quick and dirty, the basic steps are:

  1. Create individual frames in Microsoft Word (or any text editor).
  2. Take a screen-shot of each of these frames.  Generally this is done by pressing the ‘Prt Scr’ or ‘Print Screen’ button on your keyboard.
  3. Paste the individual screen-shots into Microsoft Paint, one at a time and save each as their own file.  You want all of the images to have the same width and height (400 by 300 is good or 800 by 600).
  4. Open up Windows Movie Maker and import all of the image frames created in steps 1 to 3.
  5. Drag the images and order them into the movie time-line below the collection of images.
  6. Add special effects, like video transitions, subtitles, narration, whatever.
  7. Save the project (so you can edit it later) AND save it as a movie as well. 
  8. Upload to your favourite video sharing site (Youtube, Vimeo, Pixorial) and share it with whomever you want.

Here’s an example video done by a student in a single 85 minute period (they actually had about 70 minutes to work on it because of pre-activity instructions).

Using filters in Gmail to automatically move “****** is now following you on Twitter!” messages out of your inbox

Here’s the basic idea.  You have a bunch of messages every day from Twitter telling you that someone new is following you on Twitter.  They clutter up your Gmail inbox, but you don’t want to delete all of them because they are a record of your followers, and maybe you want to follow some of them back.

The solution is to use the Gmail filters to send the messages directly to their own folder, so they don’t clutter your inbox.  Here’s how you do that.

First you open up one of your messages from Twitter where someone has followed you, even if this messages is in your deleted message folder.  You need to know what the return email address for these types of messages, and it appears that this message varies depending on WHO Twitter is sending their follow information.  You may notice that the format of the emails is twitter-follow-davidwees=gmail.com@postmaster.twitter.com.  Whew, thats a long email address!  Anyway, select the email address, excluding the < and > like I have done and get ready to paste it soon.

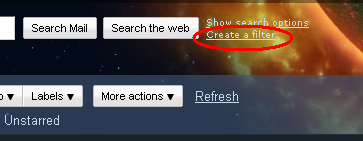
Second you click on ‘Create a filter’.  You can create the label for your Twitter messages first if you like but I’ve chosen to start directly into the filter.  The link for creating a filter is probably right next to your ‘Search the Web’ button, but could be somewhere else.  I’m using a neat space theme for my Gmail theme, so maybe this looks a bit different than in your gmail box.

Once you have clicked on this button another dialog will come up.  It will be helpful at this stage to know a piece of information, specifically the email address I told you to copy earlier.  Now you fill in the information requested as follows.

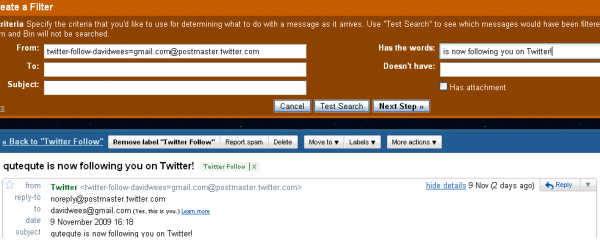
You may notice that I have pasted the email address from step 1 into the from box and into the ‘Has the words’ box I’ve inputted ‘is now following you on Twitter!’.  These two things combined should ensure that none of your other email ends up in the wrong location.  Now you click on ‘Next Step’.  You can check that the search works by clicking on ‘Test Search’ but trust me, this should work (unless Twitter changes their email address for your follows or the message that you receive when someone follows you).

You should up with another box appearing.  You want to check some of the boxes.  First, since the objective here is to avoid cluttering up our inbox, we select ‘Skip the inbox’.  I’ve left ‘Mark as read’ unchecked since I want to know when people follow me, but that’s up to your personal preference.  Someone like Alyssa Milano with over a million and a half followers would probably want to check this box.    I’ve also checked the ‘Apply the label box’ and am about to choose a new label.  Clearly, if you have already created a Twitter label, you can choose that here, otherwise you can create that right now.   You will probably want to also apply this filter immediately by checking the box next to ‘Also apply filter to 140 conversations below.’

You then click on ‘Create Filter’ and you should be done.  All of your messages from Twitter about new Twitter followers should nicely slide over into your custom label, and any new messages should automatically jump into this folder.  You can then check this folder periodically to see if there are any new followers you should follow back.  You get the convenience of knowing who is following you, without the inconvenience of having to manually delete or categorize these messages.


Creating a WiiMote interactive white board at my school for under $50.

So someone sent me a link to the video below and I decided to act upon it.  I thought I would link my resources I find for this project here, and keep you all up to date on how it is working.

The immediate attraction for this project was the idea of being able to create an interactive white board for what looks like close to $50.  Our school currently has three Smartboards at the Upper school and three Smartboards at the lower school and three times that many classrooms at each building.  This means that only 1 out 3 lessons is taught using a Smartboard at best, and teachers tend not to use the Smartboards.  Part of the problem here is the Smartboard technology is not immediately obvious how to use, and part of it is because of training, but access to a Smartboard is a big problem for most teachers.

First I had to do some research into the controllers themselves which are necessary, which are basically a Nintendo WiiMote and a Bluetooth receiver on your laptop.  According to Amazon the WiiMote costs about $35 and the Bluetooth receiver costs about $4.   You might also want a cheap tripod to mount the Wiimote onto, that should cost another $15 or so and is useful but optional (my tripod cost me 9 dollars) since in the video below you can see Johnny mounts the Wiimote directly on top of the LCD projector.  You also need an LED pen, which you can apparently build for about 5 dollars or purchase online.  Total cost so far is 44 dollars or if you are lucky and find a cheap tripod (like I did), 53 dollars.

As for turning the Wiimote into an interactive white board, Johnny Lee (the inventor of this process) has instructions up on his website.  He has also created a community forum where you can post questions, and if it is like most online communities I know, get answers to your questions.

Johnny Lee has also presented at TED, so you know there are some very smart people who love (and have tested) his idea.  What I really love is the demonstration of the VR system he has designed using pretty much the same hardware with some different software.

Here’s a good video showing a pressure sensitive pen, which will make writing much easier.  The brand name of the pen casing is called Tide-to-go pressure tip pen.  Yes, as in Tide the laundry detergent company.