Education ∪ Math ∪ Technology

Year: 2008 (page 1 of 2)

Communication Online with Students Outside of Class

Once you’ve started working with creating and managing online resources for your students, it becomes natural that the ways the students communicate with you is going to change a little bit.  Here are some guidelines for ways you can communicate with your students, and some ways to protect yourself while doing so.

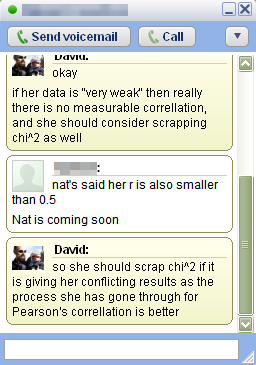
Last night a student of mine asked me a question while I was online through Google chat.  I didn’t mind answering it, and so we had a quick 5 minute discussion about her project.  This saved me a bunch of time the following day, because I didn’t need to repeat the same conversation with everyone else, I just posted the relevant information to my classroom Math blog and then all of the students had access to it.

Google chat has a very handy safety feature for teachers, it automatically records your chat history, which you have access from your Google mail account.  This means that you can easily protect yourself from any accusations of misconduct which might occur.  This process is very similar to a student calling you on your phone and so the same principles apply.  If you don’t want a student trying to contact you via Google chat, don’t give out your gmail address.

You can also communicate quite effectively with students via email.  This has the advantage of allowing multiple students to receive responses, being able to record your conversations for later, and finally being able to send responses when it is convenient for you.  I hate it when students come up to me immediately after a class and ask a bunch of detailed questions because I almost always need to go to the bathroom, or prepare for another course, or get a snack.  These are the times when being able to send an email later is very handy.

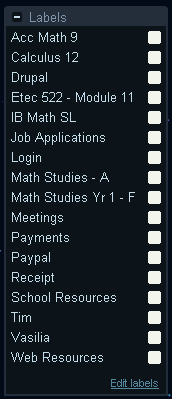
Google mail has two neat features that make email with students a bit easier to manage.  The first is that you can apply a label to any email message sent or received between you and a student, which is a handy way of finding messages from students in specific classes.  The other feature I like is called filtering, which can allow you to perform automatic actions on emails that you receive depending on the sender, the contents of the email, etc…  One of the things I like to do is automatically label student emails by class when I receive them.

Finally, never delete emails between you and a student.  They are proof that you have been trying to help the student, which can be useful for administrative reasons I won’t go into here.  You can keep them to help yourself remember what types of questions ask about particular topics.  Finally your record helps protect you from potential problems later.

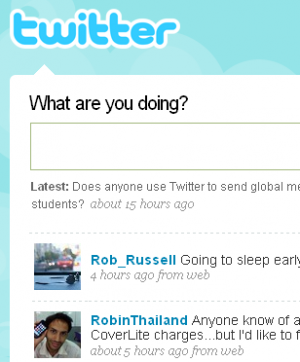
An interesting and relatively new way to communicate with students is through a website called Twitter.com.  This website basically acts as a place where you can post a quick (140 characters maximum) message to the world, and anyone who is "following" you gets a copy of the message.  Since you can forward messages sent to you to your cell phone, it allows you to receive messages from an online source quickly and easily to your mobile phone.  This can be an easy way to set up a one-way broadcast system between you and each of your students in a particular class.  As long as you don’t "follow" your students’ messages, you won’t get any messages from your students that you don’t want.

Emails and chats are good for 1 on 1 or 1 on a few types of communications, but by far the best tool I have used for communication with my students is my classroom blog, described in another post.  Basically, I post information, worksheets, assignments to my mathematics blog, and students can all come read it on their own time.  The information is totally public and always available to look at later.  I also have students do daily summaries of what happened in class, which means I have a record of all of my lessons.  Students are free to post comments, which gives me some idea of what the class understood, and what they had difficulty.  For some reason I find my students are a bit more honest when responding on the blog, or rather less likely to remain silent about difficulties.  In fact, I’ve enacted policy changes because of legitimate complaints students have brought up through the blog, so it has acted as a tool to empower students as well.

These are 4 ways you can communicate online with your face to face students on a day to day basis.  Although we all don’t want our professional life to creep into our personal life too much, we also want to make sure that we help our students learn effective modes of communication, and that they have the help they need to handle those difficult projects we seem to be throwing at them endlessly these days.  Stay tuned for a future article about how to use Dimdim.com for communicating with up to 20 students simultaneously for free.


Using Camstudio to Create Videos Tutorials

Once in a while I have a new application, web applet, or web site I want students to use.  Occasionally these programs are somewhat tricky for my students to use, so when this happens, I create a simple video for my students to watch to introduce the programs.  Of course, I don’t want to pay any money to create these short tutorials, so I have a simple process I follow (which works on Windows):

1.  Use Camstudio to record the video (and audio).

2.  Record the short video (usually 2 minutes long or so) as many times as
     necessary to get it right rather than editing the video.  The free video editors
     I’ve seen have not been user friendly at all so I find it easier to re-record.

3.  Upload the video to Youtube.com.

4.  Post the video using the embed feature of Youtube, or link the video from my
     classroom blog.

What do you need to do this?  Well first you need a computer fast enough to handle recording the video and processing whatever other program you are working with.  Most modern computers should suffice, but still, I tend not to have any other programs actively running at the same time.  Also, I’ve noticed that Camstudio tends to have trouble recording certain embedded multimedia (like recording a video of a video can be problematic).  The second thing you need is a decent microphone for recording audio with your presentations.  I use a simple analog microphone that I plug into my computer, and then I do my recording with as little background noise as possible.  Of course you need to download the Camstudio program, which happily you can do from this page for free.  The last thing need is a Youtube account, which again is free, as long as your videos are less than 10 minutes long.

The Camstudio program is divided into a bunch of smaller programs, including Player, Playplus, Producer, and Recorder.  Of these programs, the only one I actively use is Recorder, although Player opens up automatically when I finish recording. 

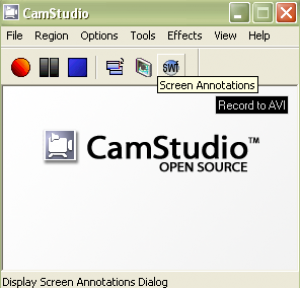
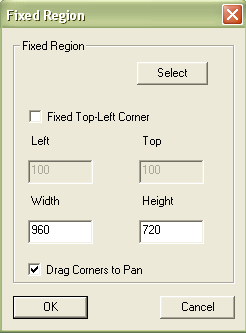
When I start recording, I open up Camstudio Recorder, set up my tutorial space I want to record (whether it is an application, a website, or whatever) and then change the settings in Camstudio Recorder so that I record the part of the screen I want to record. 

There are a couple of useful settings in Camstudio you should know about.  The first is the recording region, available from the top menu under the Region menu.  You can either choose a fixed region, the currently active window, or full screen mode.  Active Window and Full screen are easy to set up, with Fixed Region I usually select the specific part of the screen I want to record and not select the top corner to be fixed.  Some sample settings are shown to the right.  This allows me to specific how large the recording window is, and then I can choose where I want the top-left corner to be when I start recording.

The second useful setting is under Options ⇒ Program Options ⇒Minimize program on start recording, which I basically use to hide Camstudio before I start recording.

There are lots of other options for Camstudio which can play around with.  I find the program remarkable easy to use, given the power it provides you with.  The program does not take up a lot of space or require any special installation, which means you could easily run it from a thumbdrive and take it around with you.

To start recording, you click on the red circle, when you are finished recording you either click on the blue square, or press F9 on your keyboard.  If you want to pause for a second in your recording, you click on F8 or on the pair of black rectangles.  As soon as you finish recording, Camstudio Player should pop up after the audio is compressed, and show you a preview of the video.  If you are satisfied with it, you can login into your Youtube account and upload it.  If not, re-record and run through the steps again.

This is an excellent way to produce short tutorial clips for sharing with your students.  For the other steps in this process, they are a little bit too complicated to include in this simple tutorial, but there are lots of web pages that explain how to upload a video to Youtube, and then embed that video in your blog.  Now you are ready to create your video tutorials!

Tips for keeping your digital self organized using Google applications and services

In today’s modern world, teachers are faced with an ever more difficult task of keeping their resources and their lives organized.  It feels like greater demands are being expected from teachers and that our job is becoming more difficult.  Here are some simple things you can do to both keep yourself more organized, and in the long run save yourself a lot of time.

Google has a number of wonderful applications, and I’m going to talk about a couple of them in a bit of detail here because they will help you immensely, once you know their power.  I have been using the calendar application provided by Google for a year and a half now, quite successfully, to both store my lesson plans, and keep track of my schedule.  The other application I use multiple times daily is Gmail.

It has a number of important features that I should mention.  The first is that you can have as many calendars as you like, and switch the display between the calendars.  This allows you to, for instance, share a calendar with someone else and overlay your calendars to find a common meeting time by looking for the places where neither of you have something scheduled.  It also allows you to edit a private calendar and then easily switch to editing a public calendar.  Another nice feature is the ability to subscribe to your calendar and receive daily reminders about what you have planned for the day in email form.

The best feature of the Google calendar, in my opinion, is the ability to set it as either private or public.  When your calendar is private, you can invite individual people to view your calendar, but otherwise it remains hidden from the public.  My wife is subscribed to my calendar and I to hers, and we can share information between the two of us pretty easily.  However I also have a public calendar I’ve created and I provide a link on my class blog so the students can see the calendar.

As for Gmail it has a number of cool features.  The interface is extremely easy to use, and includes useful features like creating automatic filters for your incoming email messages, labelling conversations to make them easier to find in the future, and built in chat with other Gmail users.  You can also add widgets to your Gmail page, like for example embedding a display of your personal Google calendars or a comic of the day application.  The size allocated to you is gigantic at over 7 gigabytes of space and counting.  I almost never delete any of my messages, and with their custom "Search your mail" feature, you’ll never lose an email again.

Both of these applications work together to provide you much of the power of Outlook on Windows, but accessible from anywhere you have an internet connection.  As well, I am fairly sure you can access these two applications from your iPhone or Blackberry, and I have some seen tutorials on keeping your portable information devices synced with your Google applications.  These two applications together can save you a lot of time and effort keeping track of information you have received and things you have to do.

I’ve been using Google Sites with my students on a recent project, and it is a very easy way to create a website, either for personal or professional use. You can easily create multiply web sites, and invite students (or anyone with an email address) to help you build a site, while keeping your other sites separate. As well, each site can individually be set to be publically viewable, or viewable by invite only.

In your Google sites you can embed pictures, videos, and Google calendars. This gives you an easy way to take the calendar you created using Google calendar and display it for your students, allowing students and parents to view your school schedule. Saves a lot of time when negotiating with your students about when to meet them for extra tutoring.

Try out these web applications sometime. Trust me, you won’t regret it.

Ways to use Geogebra in a mathematics classroom

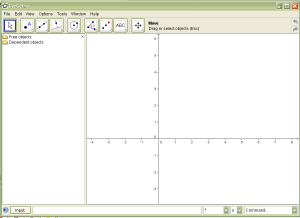
There are a lot of good open source programs out there, but not many of them have direct application to a mathematics classroom the way Geogebra does.  Geogebra is a software package for creating and manipulating geometric objects.  It also allows for graphing of funcitons and manipulating the functions in all sorts of interesting ways.  It runs on the Java framework, which means if you have Java installed on your computer, you can run Geogebra, which makes it any Java enabled operating system.  This means the very same program will run on Windows, Mac, Linux or Solaris, although the installer is different for each operating system.

If you are planning on using the program with your students, it is nice to know that they can install the program for free, and that it is very likely to work on their computer.  The only caveat is that you need to make sure the students have the right version of Java installed if they have any problems as this can sometimes be an issue.

Geogebra has all of the standard Geometry software functions.  You can add lines, circles, ellipses and all other sorts of geometric functions to the document.  You can also make one object a dependent of another object which means that changes in the original object propagate to its dependent objects.  So in other words, if a you draw a line segment which depends on the location of point A and point B, changing either point A or point B modifies the line segment.

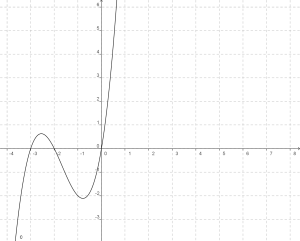
There are 2 cool things I like about Geogebra.  The first is that you can export your working file as a dynamic worksheet on a web page, which means you can easily make what you are working on web ready.  The second feature which I use all of the time is the ability to export my current file as a picture in PNG (and a few others) format.  This allows me to use Geogebra to create graphs for inclusion in my online posts, something my students and I use Geogebra for all the time.

Geogebra also has an input textfield, which means that every command you can use the interface to enter, you can also type in.  Some commands are done much more easily through the input textfield, things like entering y = x^2 + 3x which uses the nature notation to graph a function.  Entering Function[x^2, 0, 2] graphs the function over the domain from 0 to 2 for x.  Very handy.

Using Geogebra with your classroom is an affordable way to bring high quality geometry software to your classroom at an extremely affordable price (its free!!).  I’ve only scratched the surface of what Geogebra is capable of doing, I suggest you try it out yourself.  Maybe when I have time I’ll create some tutorials on using it.


Resource sharing between teachers.

As part of my Masters degree, I have created a venture pitch for a project I am working on called Pedagogle.com.  Our assignment was to create a pitch as if we are the CEO of an organization which is looking for venture capital.  We are essentially creating our own start up idea, and then learning how to create a pitch to market our idea.

The process has been quite fun, although I have found myself wading through problems editing the video, and getting the quality of the video high enough to make it worth watching.  I tried unsuccessfully many times to convert it into FLV format to reduce the size of the file a bit, but found the quality degraded too much to make it worthwhile.  So I gave up, and settled on both embedding the file within a page, and providing a link to download the file as an AVI.  Hopefully everyone can figure out a way to watch the pitch.  Unfortunately this means the file size is sitting just under 50 MB which is pretty large.  I’m not going to want to host this myself for too long…

The idea of my pitch is to introduce how organization of information has evolved over time and to place Pedagogle as a logical step in that process.  As I go through the pitch I introduce some benefits of Pedagogle, but am mostly focussing on the organizational benefits as I see those as the most important reasons why a teacher might want to use this resource.

On the page where my venture pitch begins, I describe some other reasons for using my service, including the fact that other people will use it which improves the pool of available resources and that your resources are automatically backed up for you, reducing the likelihood of computer malfunction costing you hundreds of hours of work.

Anyway, check out the pitch and the site, Pedagogle.com and let’s see if we can make a difference in the lives of educators.

Formatting mathematics equations online

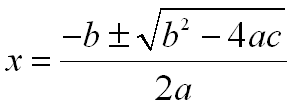
One difficulty faced by any mathematics teacher who wants to present material online is formatting of their documents.  Ideally, you’d like to be able to add equations to your online documents as easily as you can to Microsoft Word.  Unfortunately, this is not the case.

Over the past three years, I have researched a number of options.  There are no simple solutions to this problem, just solutions with varying degrees of difficulty.  A number of these solutions are within reach for your students to use as well, should your students be involved with any of your online projects.

The simplest solution I have found is unfortunately using a propietary program.  Basically the steps are as follows.  You open up Microsoft Word, and confirm you have the bundled Equation Editor installed.  This is likely to be true in Word 2003, and virtually assured in Word 2007. 

Basically the steps are as follows.  You create the equation using Equation Editor.  It really is one of the easiest programs to use.  Unfortunately, in both 2003 and 2007, the equation is not immediately an image, it is and object in a Word document, so you need to find a way to export it out of the program.  If you are using 2003, what you basically create a screen-shot of what appears in your monitor, and paste the result into a simple image editor.  Crop the screen-shot appropriately, save it as a file, and you are good to upload your image for insertion into your online document.  In 2007 you don’t need to create a screen-shot, you can just go to File ⇒ Save As ⇒Word 2003.  Microsoft Word automatically converts all of the equations in your document to images, which you can then Copy and Paste into some image editing software one at a time and save as pictures.

The benefit of this process is that the creation of the equations is relatively straight forward.  However, this process is a bit tedious especially if you have a lot of equations to produce.

Another option is to create the equations is to use an online equation editor such as the one available at http://www.sitmo.com/latex/.  This allows you to enter in LaTeX and produce an image of your equation.  So you enter the very cryptic x = \frac {-b \pm \sqrt{b^2-4ac}}{2a} and it turns it into the equation 
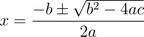
.  Fortunately on the page in question their editor allows you to modify the LaTeX using some buttons, which simplifies the process.  You can also preview the result of your LaTeX to make sure it is correct.  You then save the resulting preview image to your computer, and upload and insert it into your post.

There are two problems with this solution.  The first is that if Sitmo goes out of business, you lose the ability to add equations in this manner.  The second problem is that you again, have to create each equation one at a time, and upload them one at a time to your online document.  The benefit of this solution is that it doesn’t require you to install any software and will work on any computer, anywhere.

A third solution is to host your own CGI on your server to convert your own LaTeX that you type into your interface to create the documents, and it is converted automatically into an equation image for you.  This is ideal, except that whether or not it works depends a lot on your server set up, and what content management system you are using.  For Drupal there is a module you can add which does this, called Mathfilter which I know works, since I wrote the module.  You can use it, and apply a patch suggested by one of the Drupal developers, to produce very similar equations.  [tex]x = \frac {-b \pm \sqrt{b^2-4ac}}{2a}[/tex] becomes  using the filter.

The problems with this 3rd solution are numerous which essentially all boil down to needing some technical expertise to install the system, and needing knowledge of LaTeX to use it.  The benefit is, you become in charge of when and where you insert equations into your documents, and you can insert them on the fly as you create your document.

Whatever method you choose, it is clear that including mathematical equations online is feasible, even if none of the solutions is really mature. 

Working with a 1 to 1 laptop program

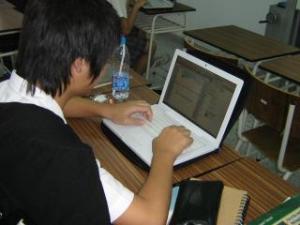
At our rather large high school in Thailand, we have a 1 to 1 laptop program.  Every student in the high school has a laptop, which they are supposed to bring to class.  After a year and half working with these laptops, I discovered the joys and pitfalls of such a system.

The really nice thing about the laptops is that you can plan activities that require a computer much more easily than schools where you have to book time in a computer lab.  Having done both, the laptops are just plain easier to work with.

Another advantage of the laptop program is that a greater percentage of the students you work with have an intermediate level understanding of how their computers work.  They can manage their documents in a relatively organized fashion, install software, navigate the web, and use a search engine, all with relative ease. It has been very rare when I have not been able to explain to one of my students how to accomplish a task.  I find myself being able give instructions to the students using higher level skills and more complicated phrases than my previous school.

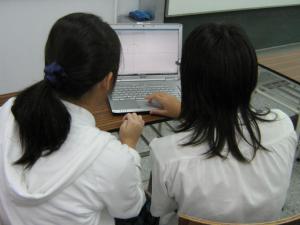
For example, I can tell the kids to ‘copy and paste’ and to ‘create a screen-shot’ and most of the kids know how to do this stuff.  I can also give instructions like ‘copy the URL for the image and paste it into the textfield on the image uploader’ and they can do it.

Another nice feature of the 1 to 1 laptop program is that it allows me to include a little bit of tech training in my lessons.  Since it is likely that the students will be using a computer pretty regularly for the rest of their lives, it seems to me that the use of a computer is one of the most important skills I can pass along to my students.

Since the students have access to a computer at any time, you can use a number of online tools quite effectively.  I have mentioned in a previous article about using Google Docs for collaboration online, and with my classes I have also successfully used blogs, wikis and other resources I have found online with my students.

There are a number of problems with the use of the laptops however which need to be pointed out.

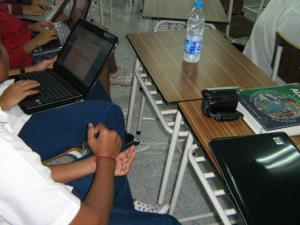
The first problem is that if you plan a lesson that involves everyone needing a laptop and one or more students does not have their laptop, you can find yourself going to your backup pretty quickly.  Students have difficulty keeping their laptops virus clear because of all of the file sharing they do.  They also sometimes just forget their laptops at <insert the location here>.

Another problem, at least at our school, is that there seem to be some limits as to how many students can access a wireless acccess point at the same time.  So once the first 15 or so students in your class get started, the next 5 or 10 students are locked out.  This can be pretty frustrating pretty quickly.

Students will also tend to use their laptops for inappropriate things during your lessons.  The student in the back that you think is diligently using their laptops for taking notes is probably text chatting with their friend in Physics or Biology.  Students who are supposed to be carefully working from a PDF version of their textbook are actually surfing blogging sites looking for next year’s fashion.  This can be real problem, and as usual you need to rely on your own classroom management skills to try and curb this kind of behaviour.  Some schools install special software on the network server to limit students access to the internet, but the kids in your class will probably just turn to computer games instead.

When all is said and done, I have enjoyed the access to a 1 to 1 laptop program I have had at my current school.  There have been some problems, but they have not been insurmountable.  It is likely that more and more schools will be looking to initiate similar programs, so we as educators must prepare for the future.

Making mathematics fun

One major barrier to students learning mathematics is that they spend a lot of time NOT enjoying themselves.  Let’s be honest, listening to poetry is enjoyable if the poetry is selected carefully.  Having discussions about current events in History, while learning critical analysis skills, is fun.  Solving a cubic equation is just not a lot of fun, even for mathematicians.

We as mathematics educators are charged with the job of making math accessible and more easily learned by our students.  It makes sense therefore to inject a bit of fun in once in a while, especially if you can justify it with some educational theory that suggests it is pedagogically worthwhile.

Trebuchet project
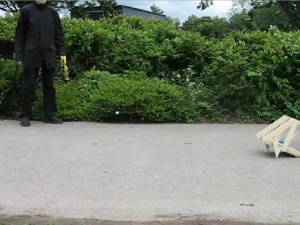
A project I have done with my 9th grade students now for 4 years in a row, is to have them do some quadratic modelling.  When I worked in London, I was really lucky because the students were creating trebuchets and catapults in their Design class.  So we had a class where the students took their models they created in Design up to the nearest park, and we took digital footage of the trebuchets in action.

At the end of the period, when the students had enough footage, they submitted some samples of their models at work in digital form directly to my computer, and that night I converted their video to a usuable form.  This actually meant I spent hours figuring out how to convert all of their wacky video formats into something readable by the FFMPEG converter to an flv file, which I could then set up to stream.

There were some technical difficulties which some of the groups had.  For example, one of the groups decided to do their footage from 20 metres away with no background…their poor little golf ball wasn’t very visible in their footage.  Another group videographer had a very unsteady hand.  However, I ended up with 6 good videos, so I split the students into 6 groups and they went to work analyzing their footage the next class.

Students had to figure out a way to convert the flight of their ball into coordinates, in other words numerical data.  They then had to decide on a model for their data, and find an equation to represent it.  I also had them calculate the mean horizontal speed (which involved being able to convert frame rates into an appropriate unit of time).  Finally there were some questions the students had to include in their write-up for this projectto focus their thinking on the physical phenomena that happened.

What was wonderful about this experience is the reaction of the kids.  At all stages of the project they were all actively engaged and interested in what they were doing.  The mathematics, which could have been very dull and boring for them came alive.

Just listen to the reaction of the students in the video when their trebuchet goes off for the first time.  How often do you get to hear a spontaneous cheer in a mathematics class?

Using a class blog effectively

Something I have been doing for the past three years now is using a blog with my classroom.  I have developed my practices with the blog over time and so far here are some of the things I have been doing with it.

The first thing for which I used my blog was to distribute information to the students, and provide announcements for the class.  Some of the things I might announce would be dates of upcoming tests, due dates for assignments, and upcoming topics.  I also used the blog originally as a way to provide links for resources, intended to be used in class.  This way students would not have to type in any lengthy URLs and could just click to get straight to the online resource.  Occasionally I would also upload a file to our class blog and expect the students to be able to download it for access.

Now that I have been using a blog with my classroom for a few years, I have found some more sophisticated ways of using it, which I want to discuss here.

One immediate change I made was to transfer the load of publishing to the blog with my students.  In the first year that I tried this, what happened was that one of my classes, an advanced grade 10 math class, posted daily summaries of what happened in class to the math blog.  This responsibility rotated around the class and when each student had posted their blog, they chose the next person.

This worked reasonably well, since occasionally students would come to class with questions they had discovered when reading the blog.  They would also occasionally comment on each other’s summaries and I hope that most of the students read each other’s posts.

The next step I took was logical, having tested out blogging with a class, I decided to try it with all of my classes.  I actually took the time to install the blogging software myself, hosted on my school’s server, so that I would have greater control over the process.  I wanted to be able to easily administrate the students’ accounts and be able to assist them with common problems, like forgetting their passwords.  I also made sure that posting to the blog was a part of the students’ grades, given its growing importance.

As soon as I did this, it became clear to me that not all of my students were reading the blog on a regular basis.  So this year I implemented another change, students would be marked on their full participation in the classroom blogging.  Not only would they be rotating through responsibility for creating summaries of that day’s class, they would have to post comments on the summaries for other student’s summaries.  This way I could guarantee that students were at least reading each other summaries.  The comments students have produced have mostly been really appropriate and high quality.

When I added the commenting on each other’s posts, something fascinating happened.  The quality of the blog summaries improved.  Students were aware that I grade the quality of the blog, but that I use a pretty forgiving rubric.  If students complete their summary, and it makes sense, they get full marks for participation.  What has obviously driven the improvement in their posts has been the awareness that their peers are reading them.

I think a second driving factor in the improvement in the quality of the posts has been a bit of competition, particularly among the stronger mathematics students.  They are basically competing to see who can create the best post.

Some of the posts, especially recently have been exceptional.  Students have become more comfortable with the format and are incorporating humor and more media into their posts.  Graphs and properly formated equations have almost become an expectation for their posts.

The ways students have been creating the graphs and equations have been quite creative.  Some students find images from other websites online, and use these instead.  Some students take the time to create their images instead using programs like Microsoft Paint, Adobe Photoshop, and Geogebra.  For the creation of the equations, most students have been using my built in Equation parser (which means learning a little bit of Latex).  The equations shown in the pictures here are actually created in Microsoft Word, and then exported to pictures using a lengthy process.

I’m not sure what the next step is.  I know I need to collect some information.  At some point near the end of the semester, I plan on collecting some anonymous data from the students to try and answer the following questions.

  • How long, on average, does it take you to create a summary?
  • How often do you check the blog to see if any new summaries are up?
  • Do you read the summaries from any of the other classes?
  • Have you felt any of the comments have been too critical?

In summary, blogging with your students as a class can be an effective way to increase their retention of your material.  They may end up learning some of the material from their peers because of the differences in how it is explained.  Your students will also end up having to view your classroom material in a different format, so it will activate a different part of their brain, and so some students will benefit from this experience (think Howard Gartner’s multiple intelligences).  Your students will also be likely to learn some valuable technical skills from the experience.  Finally, your students may just enjoy the experience, which will make them enjoy (and remember) your class for a bit longer.

Using Google Docs when teaching mathematics

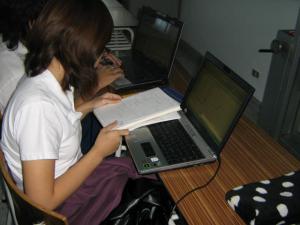
Google has a lot of cool tools they have been working on recently, and I enjoy trying them out.  Once in a while they come up with a tool you can use in your classroom right away.

One of the tools we are using in my classroom right now is Google Docs.  This is an online document collaboration tool which allows people from anywhere, using most modern browsers to upload, edit, and share documents online.  It supports many different formats, and you can export the document and download it at the end if you finish working on it.

I have been using it as a place for my students to share their workload.  I created 12 Google Documents, 1 for each of 12 groups in 2 different classes.  I then collected the email addresses of my students and assigned them to groups of 3.  I went through each of the 12 documents and used the ‘Share’ feature of Google docs to allow the students to collaborate on the each document as well.

One caveat I discovered is that if the student’s email address is not a Google mail account, they need to verify their account.  Unfortunately this verification process takes about an hour of real time, presumably as Google syncs up the account verification across their many, many servers.  There are two solutions to this.  The first is to make sure you have the students do the account verification a day before you actually want them to use the documents.  The second solution is to have the students sign up for Google mail accounts first, and then send them invitations to their groups.

To be honest, mathematics as a subject is not especially suited for online collaboration.  This is because the creation of equations can be a bit tricky for the uninitiated.  There are a number of solutions for creating professional equations online, which all have their benefits and drawbacks.

The first and easiest solution for the students is to use Microsoft Word and create their equations in Equation Editor (or if you can afford it the far superior Mathtype).  The only problem here is that the kids think they can copy and paste the equations into their documents, which of course doesn’t work.  The second problem is that if you ‘Import’ a document (another feature of Google Docs), your equations don’t make it.  Ugh.  The work around for me was to have the students take screen-shots of their equations in Word, and then crop the screen-shots in an image editor program (like Microsoft Paint).  I’m not normally a huge fan of Microsoft programs, but their Equation editor really is one of the best tools for easily creating equations I’ve seen.

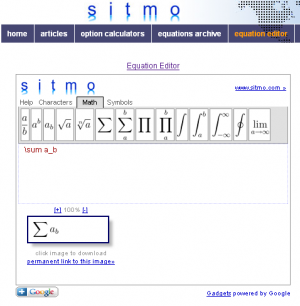
The second solution is to use one of the online services offered to use the Latex document format and an elaborate system to convert the Tex documents produced into equations.  The one I like best right now is offered by www.sitmo.com.  You basically create the Latex, which is made easier using the editor above, and you can immediately preview the results.  Underneath the preview image there is a link, which the students can right-click and ‘copy link location’.  Once they have the link to the image, they go back to the ‘Insert => Image’ offered by Google Docs and paste the link into the textfield provided.  I have been teaching my high school students some Latex and they have picked up the simple things pretty quickly.

Formating the text otherwise in the editor is relatively straight forward, it feels similar to how you format text in most word processing programs, which maybe a few less options.  What’s brilliant about this system is that each student can be editing exactly the same document online at the same time!  You can also be sitting at your desk with all of the documents open and see the students editing the document.  This means a little bit less concern about students messing around while accessing the internet, which is always a huge problem in a 1 to 1 computer set up.

The other handy feature is the ‘View revisions’ tool which allows you to see what changes have occurred to the document over time.  I use this to see who added what to their projects and to make sure that each student contributes at least approximately equal amounts to their projects.

When the students are done working on their document, you can just go and look at it online and grade it.  No need to print out the document, but if you feel the need you can download it in your format of choice and then print it out.  They have a print directly feature as well, but I have found the output varies greatly depending on your browser.

Deciding what kinds of projects are appropriate for this kind of collaboration can be a bit tricky.  I am currently using it for my students to produce sample projects for their International Baccalaureate (IB) Mathematical Studies course so they have a bit more practice before they have to do the real thing.  What you decide to use it for is up to you, but note that some of the problems (like inserting equations or graphs) don’t happen in other subject areas, so this technique might be even more useful in an English class, for example.